Removing a wallpaper border starts with identifying what is underneath: paint or full wallpaper. That determines your entire approach. For borders on paint, try dry peeling first, then score lightly and apply fabric softener solution for 10 to 15 minutes before pulling. For borders on wallpaper, skip aggressive scoring and work more gently. Always prime the wall after removal before repainting.
Wallpaper borders are a different animal from full wallpaper removal. They’re applied in a narrow band, usually 5 to 12 inches wide, and they sit on top of either painted walls or full wallpaper. That makes the job sound easier, but borders are actually tougher to remove cleanly. The adhesive on a border is concentrated in a smaller area, which means it creates a very strong bond. I’ve seen homeowners succeed with full wallpaper removal and then struggle for hours with a simple border. The technique is different, and knowing the difference saves you time and wall damage.
I’ve removed hundreds of borders in homes throughout Auburn and Placer County, and the failures almost always come from treating them like regular wallpaper. If you’re planning a border removal, the approach depends entirely on what surface it’s stuck to. Let me walk you through the exact method I use.
How Do You Identify What Is Underneath the Border?
Before you touch anything, you need to know whether the border is applied over paint or over full wallpaper. This determines your entire strategy. If the border is on paint, moisture removal works. If it’s on wallpaper, you might have to remove wallpaper underneath too, or work around it differently.
How do you tell? Look at the edges of the border, especially at the seams and corners. If the edge is sitting on a flat painted surface, you’re dealing with paint. If there’s texture or a pattern showing underneath, the border is on top of full wallpaper.
You can also gently try to lift one corner of the border with a putty knife. If it comes up easily and you see smooth paint underneath, it’s on paint. If resistance is immediate or you see adhesive extending down to another layer, the border is probably on wallpaper.
Should You Try a Dry Peel First?
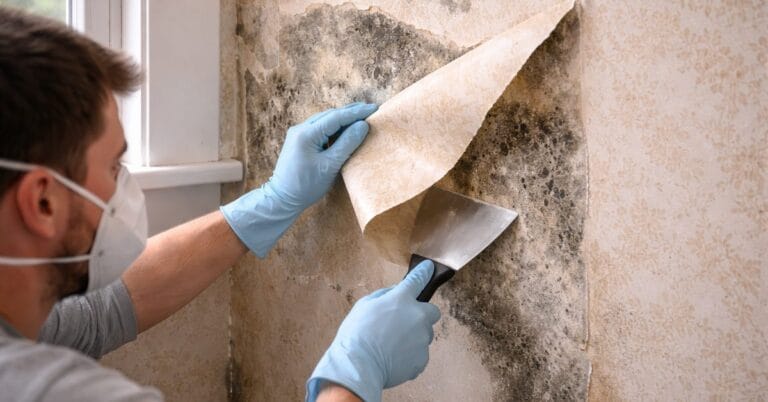
I always start by trying to peel the border dry. Find the best corner, usually where the border meets trim or a seam, and use a plastic putty knife held at a very shallow angle. Apply light pressure and try to get under the edge. If the border starts to lift and peel cleanly, keep going slowly. Some borders, especially newer ones applied 5-10 years ago, come off easily this way.
If you’d rather have a professional take care of it, take a look at my wallpaper removal services.
The key is patience. Work slowly along the entire length rather than yanking on one section. Let the border lead you. If you feel significant resistance within the first 12 inches, stop. Forcing it will tear the border and leave adhesive behind. It’s time to score and soak.
Never start by trying to peel a border applied to full wallpaper dry. The wallpaper underneath isn’t strong enough to support that force, and you’ll end up with torn wallpaper and border fragments stuck to the wall.

How Do You Score a Narrow Strip?
For a border stuck to paint, scoring is different than scoring full wallpaper. You’re only scoring the border itself, not a large area. I use the same scoring tool (those hand-held pin wheels), but I focus just on the border strip. Roll it lightly across the entire length of the border, going over it two or three times to create good perforation.
Be especially careful at the edges, the sides and bottom of the border are the thinnest part, and it’s easy to gouge the paint underneath if you press too hard. The goal is to perforate the border enough that moisture gets through, not to score the paint below.
If the border is on full wallpaper underneath, scoring gets trickier. You still score the border, but you’re trying not to score the wallpaper below. Light touch only. If the wallpaper underneath starts to show damage (paper gets fuzzy or you see tears forming), stop and switch to soaking only, skip the scoring for the wallpaper layer.
When Do You Use Fabric Softener vs. Commercial Remover?
For borders on paint, I use fabric softener solution before I try commercial wallpaper remover. Borders have tough adhesive, and fabric softener breaks it down incredibly well. Mix equal parts fabric softener and warm water in a spray bottle, and mist the entire border generously. Let it soak for 10-15 minutes.
The fabric softener doesn’t soak into the paint, so you’re not damaging the painted surface underneath. It breaks down the border adhesive. After 10-15 minutes, the border often peels away cleanly.
If the fabric softener doesn’t work after a few applications, then I move to a commercial wallpaper remover (like DIF or Roman PRF). Mix it according to package directions and apply the same way, spray, wait, peel. The commercial stuff is stronger but also riskier for the paint below if you’re not careful. I only use it after the easier methods fail.
For borders on wallpaper, I usually stick with fabric softener solution. Commercial removers can soften the wallpaper underneath too much, and you end up with bigger problems. If the border is really stubborn and it’s on top of old wallpaper you’re planning to remove anyway, then full wallpaper removal might be your best path.
How Do You Handle Corners, Seams, and Problem Spots?
Corners are the hardest part of border removal. Borders are mitered or overlapped at corners, and the adhesive gets concentrated there. I work corners last, not first. After the straight sections of border come off, the corner sections are usually loose enough to peel away separately.
At inside corners (where two walls meet), the border often overlaps itself or is folded. I score this area extra carefully and apply remover solution multiple times. Then I gently work the layers apart, peeling slowly so the wallpaper underneath doesn’t tear.
At outside corners (like a corner cabinet or column), the border wraps around. Score both sides, apply solution, and work from the corner outward on both sides. If one side starts to tear, switch to the other side to give it more soak time.
Seams are where the border meets trim or the ceiling line. Adhesive gets into every tiny gap. Work these slowly with a damp cloth and gentle scraping. A dull plastic tool, not a sharp metal scraper, is your friend here. You’re persuading the adhesive to let go, not attacking it.

How Do You Remove Adhesive Residue From Paint?
After the border comes off, there’s almost always adhesive residue left on the paint. This can range from glossy patches to hard crusty bits. The paint underneath is usually fine, borders sit on top of paint and don’t damage it during removal. The adhesive is the problem.
For light adhesive residue, I use a damp sponge and warm water. Wipe it gently in circular motions. The dampness softens the remaining adhesive, and rubbing breaks it down. You’ll go through a lot of water rinsing, but it works.
For heavier residue, fabric softener solution again. A few spritzes, a quick wait, then wipe with a damp sponge. This takes patience. You’re not trying to strip the paint, you just want the wall to feel clean and smooth when it’s dry.
For really stubborn crusty bits that won’t respond to water or fabric softener, a plastic scraper held at a shallow angle can gently chip them away. Do this lightly. Aggressive scraping can dull or mark the paint, and then you have a different problem.
Once the wall is dry, run your hand over it. You should feel the paint, not a sticky or glossy coating. If there are still rough spots or adhesive marks, a light sanding with 120-grit sandpaper will smooth them out before you repaint.
How Do You Remove a Border That Is on Wallpaper?
If the border is stuck to full wallpaper, removal gets complicated because you have to decide: remove just the border and leave the wallpaper, or remove both.
If the wallpaper is in good shape and you’re keeping it, try to remove just the border. Score only the border, apply fabric softener solution, and peel very slowly and gently. The goal is to separate the border adhesive from the wallpaper without damaging the wallpaper underneath. This is tedious, but it’s doable.
If the wallpaper is old, damaged, or you’re planning to repaint anyway, it’s often easier to remove both the border and the wallpaper together. Follow the standard wallpaper removal process, which handles both layers at once. Trying to remove just the border and then doing wallpaper removal in a second pass is twice the work.
How Do You Prepare the Wall for Painting After Border Removal?
Once the border and adhesive are gone, what comes next depends on what condition the wall is in.
If the border was on good paint and removal was clean, you might just need a fresh coat of paint. The border leaves a faint line where the paint is slightly different (different finish, slightly faded from being covered). One coat of fresh paint usually covers this, especially if you use a paint-and-primer combo.
If the paint underneath the border is noticeably different in color or sheen from the rest of the wall, you’ll need to repaint the entire wall or at least a large section. Trying to just paint the border line never blends well.
Always prime first if you’re repainting. A coat of primer-sealer locks down any adhesive residue, fills small imperfections, and ensures good paint adhesion. I use Kilz or Zinsser BIN, tinted to match the finish paint. This is especially important if you had to scrape or sand the wall, primer seals everything and creates a uniform base.

When Should You Call a Professional?
Border removal is usually a DIY-able job, simpler than full wallpaper removal. But if you have multiple borders around a room, or if the border is really old and heavily adhered, professional removal saves time. A steamer or commercial equipment speeds things up, and experience prevents damage that costs more to repair than the removal would have cost.
If you’ve already tried removing a border and it’s not coming clean, or if the paint underneath is getting damaged, stop and call for help. I’ve seen homeowners spend an entire Saturday on a job that takes me a couple of hours with the right tools.
If you’re in Auburn or the surrounding Placer County area and you’re ready to remove a border but want professional help, get in touch and I’ll take care of it.
Wallpaper border removal is one of the interior prep tasks I handle throughout Auburn and Placer County. If you need a residential painter in Auburn for wallpaper removal or interior painting, take a look at what I offer.
Frequently Asked Questions
Can I paint over a wallpaper border instead of removing it?
Technically yes, but I don't recommend it. Borders create a ridge or lip even if they're flat, and paint will highlight that line rather than hide it. Over time, paint over adhesive can fail or bubble. It's better to spend an hour removing the border and then paint a clean wall. The final result looks much better.
How do you remove a border from painted walls versus wallpaper?
For borders on paint, you can try dry peeling first, then score and use fabric softener solution if that fails. Paint is tough and won't damage easily. For borders on wallpaper, avoid scoring the wallpaper underneath and use fabric softener instead of commercial removers. If the wallpaper is old, it's often easier to remove both the border and wallpaper together.
What solution works best for removing a stubborn wallpaper border?
Fabric softener mixed with warm water is my first choice for borders, it's gentle on the paint or wallpaper underneath and breaks down border adhesive really well. If that doesn't work after a few applications, try a commercial wallpaper remover like DIF or Roman PRF. Let each solution soak for 10-15 minutes before peeling.
Does scoring damage the wall when removing a border?
Not if you're gentle. Score only the border itself with light pressure, especially if it's on painted walls. A heavy hand can gouge the paint underneath. If the border is on wallpaper, skip or minimize scoring to avoid damaging the wallpaper. Use soaking and patience instead.
How do I handle a wallpaper border that won't come off?
Apply fabric softener solution generously and let it soak for 15-20 minutes, then try again. If it still won't budge, apply a commercial remover and soak for another 10-15 minutes. Work slowly in small sections rather than trying to pull the whole length at once. Sometimes you have to walk away for a bit and come back, the moisture keeps working while you're not pulling on it.
Do I need to prime the wall after removing a wallpaper border?
Yes, always prime before repainting. Primer seals any remaining adhesive residue, ensures even paint coverage, and prevents the old border line from showing through. Use a primer-sealer like Kilz or Zinsser BIN, tinted to match your finish paint color. One coat of primer followed by one or two coats of finish paint is standard.