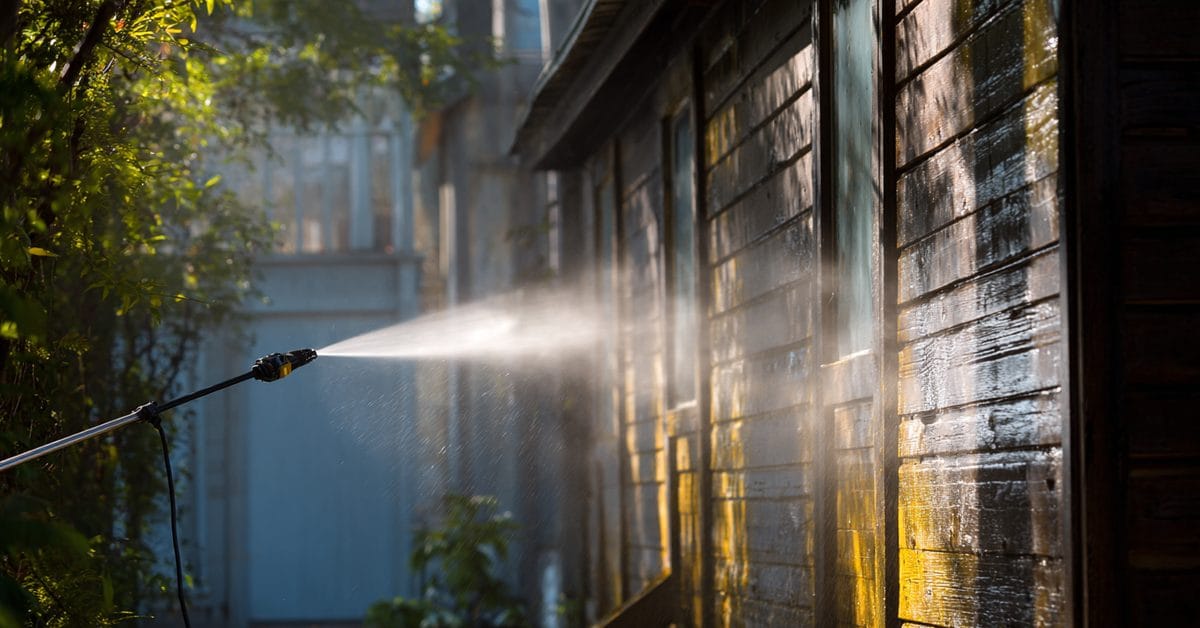
Pressure washing before painting is not optional. Paint cannot bond to chalk, mildew, dirt, or algae, and skipping this step is the fastest way to shorten the life of a new paint job. Use 1,500 to 2,500 PSI for most residential siding, add a biocide or TSP solution for mildew, and allow at least 48 hours of dry time on wood before painting. Proper pressure washing is what gives paint something to adhere to.
The difference between a paint job that lasts ten years and one that starts peeling at year three usually comes down to what happened before the first drop of paint went on. I’ve seen homeowners try to cut corners by skipping this, or rushing through it without proper technique, only to watch the paint peel and fail prematurely. In my twenty years painting homes in Auburn and the foothills, I can tell you with certainty: the painters and homeowners with the best results are the ones who understand that prep is everything.
Pressure washing removes chalk, mildew, dirt, algae, and loose paint, all the things that prevent adhesion. Paint can’t bond to a dirty surface. If you skip this step or do it wrong, the new paint sits on top of contamination and fails. Here’s how to do it right.
Why Does Pressure Washing Matter for Paint Adhesion?
Exterior paint doesn’t adhere to chalk, dirt, mildew, or the oxidized surface of failing old paint. When UV breaks down the old paint, it leaves behind a white, chalky layer of broken-down pigment. This chalk is slippery, new paint can’t grip it. The same is true for algae, mildew, and heavy dirt accumulation. These contaminants create a barrier between the new paint and the actual substrate.
Pressure washing removes all of this. When done correctly, it strips away the chalk and contamination, exposing clean substrate (or the solid base coat of old paint if the existing paint is still intact). Now the new paint has something to adhere to.
Without proper pressure washing, you’re gambling. The paint might adhere well for a year or two, but once water starts finding its way under the paint film, adhesion failure begins. Peeling starts at edges, corners, and joints. Within a few years, you have serious paint failure. It’s a costly mistake that a few hours of pressure washing could have prevented.
In the foothills climate, where we get intense UV and moisture cycling through the seasons, the substrate condition before painting is critical. A poorly prepped surface fails faster in our weather than it would in a milder climate.

What PSI, Nozzle, and Technique Should You Use?
The right pressure is critical. Too high, and you damage the substrate. Too low, and you don’t actually clean. For most residential siding, wood, vinyl, fiber cement, use 1,500 to 2,500 PSI. This is strong enough to break loose chalk, mildew, and dirt, but not so strong that it gouges wood, punctures vinyl, or forces water behind the siding.
If you’d like to see what professional results look like, check out my exterior painting services.
Nozzle selection matters. A pressure washer comes with several nozzles, measured in degrees. A 0-degree nozzle delivers a pencil-thin stream with extreme force, use this only on concrete or masonry, and never on siding. A 15-degree nozzle is aggressive; use it for heavy-duty cleaning of concrete or metal. A 25-degree nozzle is ideal for wood siding, vinyl, and most residential surfaces. A 40-degree nozzle is gentler and works well on softer materials or trim. Pick the right nozzle for your surface.
Technique is equally important. Start at the top of the house and work downward. Water naturally runs down, so you’re working with gravity, not against it. Keep the nozzle moving, never hold it in one spot. Maintain 12 to 18 inches of distance between the nozzle and the siding. If you get closer than that with high pressure, you risk damage. If you’re too far away, the pressure is weaker and you miss stubborn growth.
Work in overlapping horizontal strokes, moving from left to right as you work your way down. Maintain a steady pace. Rushing creates uneven cleaning and missed spots. Being too slow wastes time and money without improving results.
Pro Tip
Start with lower pressure on unfamiliar surfaces. Test on a hidden area first to see how the material reacts. If the surface seems tough, gradually increase pressure. It’s easier to turn it up than to repair damage from too much pressure.
How Do You Deal With Mildew and Algae When Pressure Washing?
Heavy mildew or algae growth requires more than just water pressure. The spores go deep into the paint and sometimes into the substrate itself. Blasting them with pressure alone might remove the visible growth, but spores remain and the growth returns within weeks.
Add a biocide or mildewcide solution to your cleaning process. Mix a TSP (trisodium phosphate) solution or a dedicated mildewcide product according to the directions. Many pressure washers have a detergent line that lets you apply cleaning solution, and some have a low-pressure injection mode specifically for this.
Here’s the process: apply the solution at low pressure, letting it sit on the affected areas for 10-15 minutes. The solution kills the mold spores and loosens the growth. Then switch to higher pressure and rinse thoroughly. This approach eliminates the growth more completely and reduces the chance of it returning quickly.
Avoid harsh bleach solutions if possible. They’re effective but can damage paint and are hard on the environment. A TSP-based cleaner is safer for most surfaces and works very well. Dedicated mildewcide products designed for exterior use are also good options.
How Long Should You Rinse and Wait to Dry After Pressure Washing?
After pressure washing, rinse thoroughly with clean water. Don’t leave detergent or cleaning solution residue on the surface. Any chemical buildup can interfere with paint adhesion.
Then, and this is crucial, allow adequate drying time. For wood siding, wait at least 48 hours before painting. Wood can look dry on the surface while still holding moisture inside the fibers. If you paint over damp wood, the moisture will interfere with paint curing, and adhesion will suffer. In humid weather or after heavy rain, allow even more time.
For vinyl or fiber cement, 24-48 hours is typical. For aluminum, you can often paint sooner because the material sheds water quickly. Check your paint manufacturer’s recommendations for the specific substrate you’re working with.
In the foothills, timing matters because our weather is unpredictable. Don’t pressure wash if rain is in the forecast for the next few days. You want the pressure-washed surface to have a solid window of dry weather to cure before you prime and paint.

What Should You Watch For After Pressure Washing?
Raised grain on wood. Pressure washing can raise the grain on wood siding, leaving it slightly rough or fuzzy. This is normal. Some painters sand it smooth before painting; others leave it, as a slightly rough surface actually helps paint adhesion. Either is fine.
Loose paint that needs scraping. Pressure washing may reveal paint that’s more loose or ready to fail than you realized. After washing, inspect carefully. Any paint that’s visibly loose, peeling, or bubbling should be scraped back to solid paint or bare substrate before repainting. Don’t paint over loose paint.
Stains or discoloration. Sometimes pressure washing reveals stains, rust from fasteners, algae that’s deeply embedded, or previous water stains. These usually won’t interfere with paint adhesion, but if they’re severe, a second pass with biocide solution might help. Otherwise, accept that paint will cover most discoloration.
Damage to caulk or trim details. Pressure washing can dislodge or damage old caulk, especially if it’s degraded. This is actually good, failed caulk needs replacement anyway. Fascia boards at the roofline are worth checking carefully. For more on what proper fascia and soffit painting involves, see my guide on these boards. Make a note of any areas where caulk is missing or damaged, and recaulk before painting.
Should You Pressure Wash Yourself or Hire a Professional?
You can rent a pressure washer ($60-100 per day) and handle this yourself. If your home is small, your schedule is flexible, and you’re comfortable working at height on a ladder or with a pole extension, DIY works. You’ll spend maybe $100-150 in equipment rental plus your time.
Alternatively, hire a professional. Pressure washing services in the Auburn area typically run $150-400 for an average single-story home, depending on size and condition. A pro has commercial-grade equipment, knows the right technique for your specific surfaces, and takes on the safety risks of working at height. For a two-story home or if you have complex trim work, hiring a pro is often the smarter choice.
The real question isn’t whether to DIY or hire, it’s whether you’ll skip this step altogether. Don’t. Pressure washing is too important to your paint job’s longevity. If DIY seems risky or time-consuming, hire it done. It’s an investment that pays for itself by making your paint job last years longer.
What Safety Precautions Do You Need When Pressure Washing?
Pressure washers are powerful tools and deserve respect. Wear eye protection, water and debris can splash back. Wear long sleeves and pants. Never aim the nozzle at people, pets, or yourself. Never underestimate the pressure; these machines can cause serious injury if mishandled.
When working at height, use a stable ladder and have someone spot you. Never overextend yourself. If you can’t safely reach an area from a ladder, use a pole extension or hire someone who can safely access it.
If you’re not comfortable with pressure washing safety, hire a professional. It’s not worth an injury.

What Comes After Pressure Washing?
Once your house is pressure-washed, dry, and properly prepped, you’re ready to prime and paint. The hard work is done. All the effort you put into cleaning and preparation now pays off. The paint has a clean, sound surface to adhere to. It will bond well, cure properly, and last as long as the paint is rated for in our foothills climate. For surfaces like the garage door, which have distinct primer requirements, see my guide on painting a garage door.
If signs it’s time to repaint, start with pressure washing. If you’re unsure about how to proceed or want professional-grade results, get in touch.
Pressure washing is part of every exterior painting project I take on throughout Auburn and Placer County. If you need a residential painter in Auburn who handles the full prep-to-paint process, take a look at my services.
Frequently Asked Questions
How long should you wait after pressure washing before painting?
For wood siding, wait at least 48 hours. Wood holds internal moisture even if the surface appears dry. In humid weather, wait even longer. Vinyl and fiber cement typically need 24-48 hours. Check your paint manufacturer's guidelines for the specific surface and product you're using.
Can you paint a house without pressure washing first?
Technically yes, but you shouldn't. Paint won't adhere properly to chalk, dirt, mildew, or algae. Without pressure washing, the paint will fail sooner. Proper pressure washing is essential for paint longevity, it's the difference between a job that lasts 10 years and one that fails in 3-5.
What PSI should you use for pressure washing before painting?
For wood, vinyl, and fiber cement siding, use 1,500-2,500 PSI. A 25-degree nozzle works well for most surfaces. Test on a hidden area first. Too much pressure damages the substrate; too little won't clean effectively. Always start lower and increase gradually as needed.
How do you remove mildew from siding before painting?
Use a biocide or TSP solution mixed according to directions. Apply at low pressure and let it sit for 10-15 minutes to kill spores. Then rinse thoroughly with clean water at moderate pressure. A second application may be needed for heavy growth. This prevents mildew from returning quickly after painting.
Is a garden hose enough for washing before painting?
No. A garden hose provides minimal pressure and won't remove chalk, mildew, or stubborn dirt effectively. A pressure washer at 1,500-2,500 PSI is necessary to properly clean the surface for paint adhesion. Don't skip the pressure washer step.
Does pressure washing damage wood siding?
Not if done correctly. Use 1,500-2,500 PSI, maintain proper distance (12-18 inches), and keep the nozzle moving. A 25-degree nozzle works well. Too much pressure or holding the nozzle too close can damage wood. Test on a hidden area first and adjust technique as needed.